Tenable CTF 2021 Writeups
Team Placing: #33 / 1762
Categories
-
Forensics
-
Steganography
-
Web
Challenge: Cat Taps
Category: Forensics
Description:
[100 pts]: My cat has been using the computer a lot lately. I have no idea what a cat would use a computer for, but you might. (File: usb.pcap)
Walkthrough:
Opening up the provided pcap file, we can see that this is not a packet capture of network traffic but rather it is a packet capture of USB traffic as the file name would suggest. I’ve analyzed USB traffic before in the HTB x Uni 2020 Quals CTF but that particular challenge didn’t require me to fully analyze keystrokes which, given the challenge name, is what I assumed I would have to do in this challenge.
Ok, so after doing some research and reading a few writeups from previous ctfs, I was able to figure out the information I would need to solve this challenge:
1. Determine which device we want to look at:
When a new device is plugged into a host computer, there are a few things that the host requests from the device to get as many details about the device as it feels it needs, so that it can eventually load the proper device driver. One of those requests is called “Get Device Descriptor” which contains information about the USB device as a whole.
If we look at the traffic we can see the very first two packets are the descriptor request from the host to the device, and the devices response:

Cool, so let’s take a look at that response packet to see what the host received from this device:
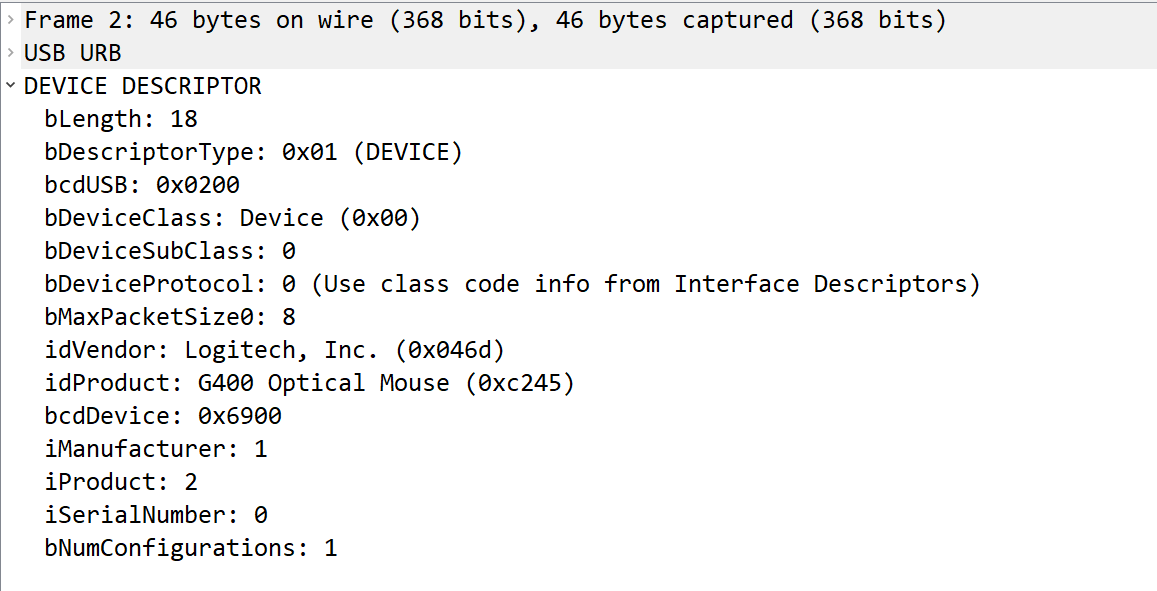
One could figure out the meaning of each field name just by googling, but for this challenge we really only need to look at the idVendor and idProduct fields. As we can see this is the device descriptor response from a Logitech G400 Optical Mouse. If we wanted to we could track the mouse location, but given the name of the challenge “Cat Taps” I’m assuming we’re concerned with keystrokes.
Looking at the next device descriptor response we find this packet:
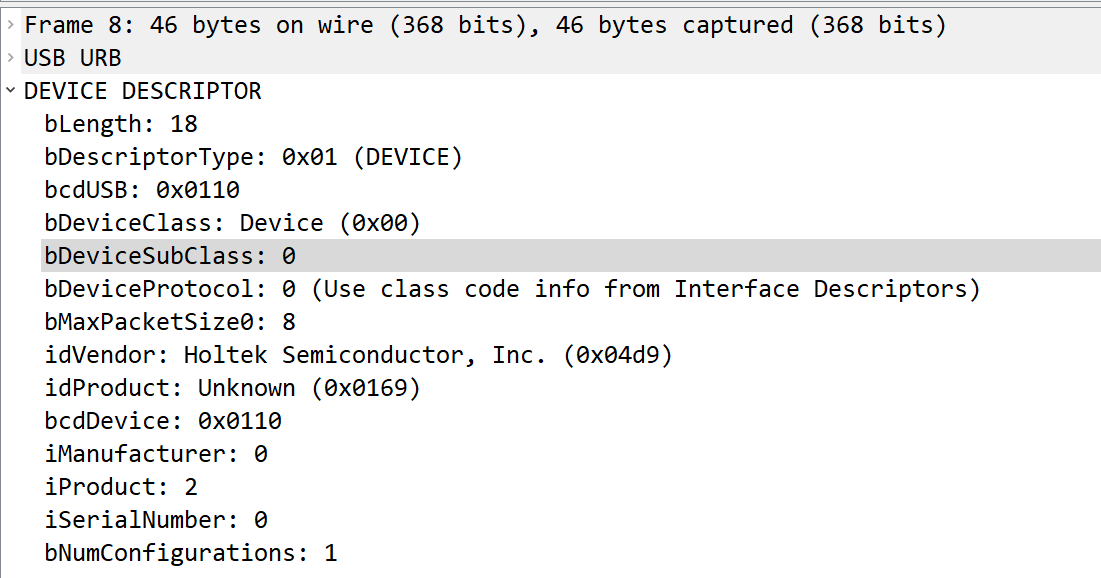
If we Google “Holtek Semiconductor, Inc.” We can figure out that this company produces parts for keyboards and so this is most likely the device that we want to look at. Looking at the address for the device, we can determine that this is device 2:

2. Extract the leftover data (keystrokes) from the device:
Cool, so we know which device we need to look at, now let’s extract the keystrokes. We can use the following filter to look at only this device’s traffic:
usb.device_address == 2
Doing so presents us with the following traffic:
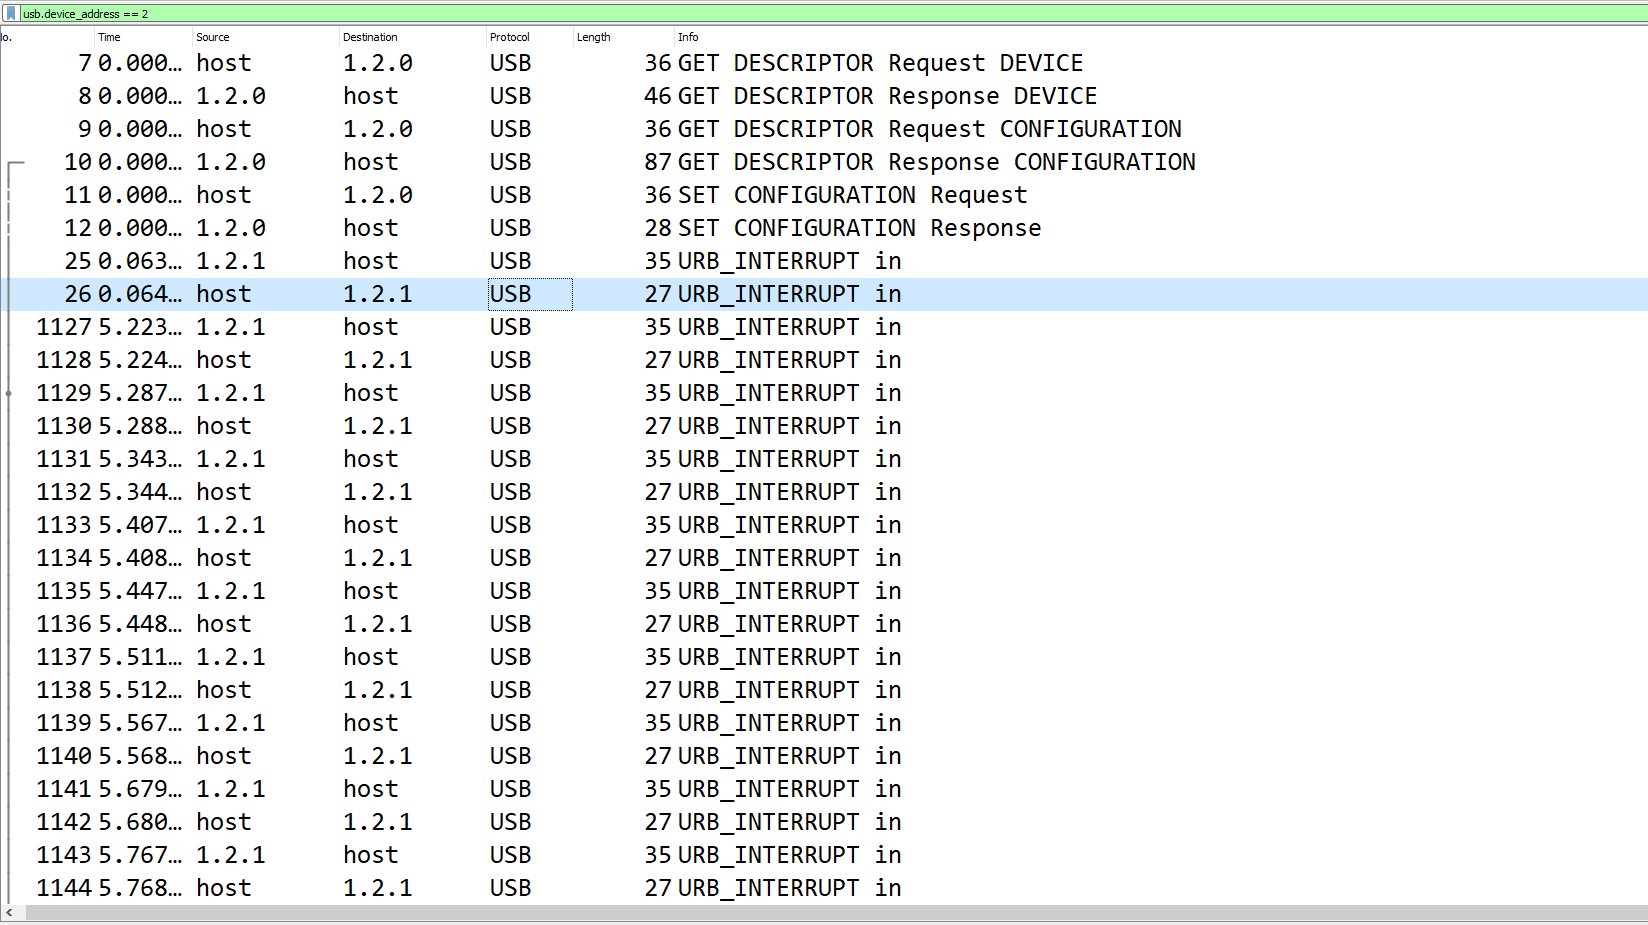
As you can see, there are various descriptor requests and responses that setup the device for use, and then around 800 URB_INTERRUPT in packets if you continue scrolling.
URB_INTERRUPT in packets are regularly scheduled IN (input) transactions between the host and the USB device. These are the type of packets that mice and keyboards use to send data to the host.
Looking at the screenshot above, you can see the URB_INTERRUPT in packets seem to alternate in length between 35 and 27. The packets that are longer contain the actual data that is being sent to the host from the device, while the shorter packets can be thought of as a confirmation from the host that it received the data.
The actual data for each keystroke can be found in the Leftover Capture Data field of each packet:

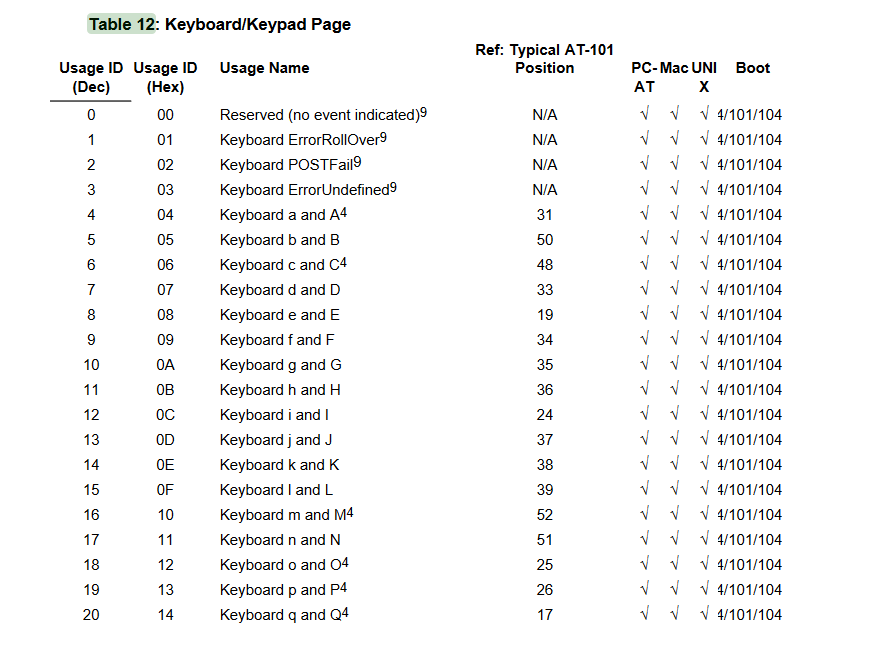
As you might have been able to guess, we are concerned with the third byte of each leftover capture data. This is the byte that contains the data for the actual keystroke in hex. There is a nice document that contains the usage tables for USB HID (Human Interface Devices) which contains a table for keyboards:
Cool! We’re just about done, we just need to extract all of the leftover data for each packet. We can apply the Leftover Capture Data field as a column in Wireshark and then export the packet dissections as a CSV. This will generate a CSV with all of the packets from our keyboard device, including the Leftover Capture Data column that we applied.
3. Decode and win
Now all we have to do is craft a script to map each hex value to the table value, and output it to us:
# Dictionary generated from table in the document linked above
table_map = {
2: "PostFail",
4: "a",
5: "b",
6: "c",
7: "d",
8: "e",
9: "f",
10: "g",
11: "h",
12: "i",
13: "j",
14: "k",
15: "l",
16: "m",
17: "n",
18: "o",
19: "p",
20: "q",
21: "r",
22: "s",
23: "t",
24: "u",
25: "v",
26: "w",
27: "x",
28: "y",
29: "z",
30: "1",
31: "2",
32: "3",
33: "4",
34: "5",
35: "6",
36: "7",
37: "8",
38: "9",
39: "0",
40: "Enter",
41: "esc",
42: "del",
43: "tab",
44: "space",
45: "_", # can also be -
47: "{", # can also be [
48: "}", # can also be ]
56: "/",
57: "CapsLock",
79: "RightArrow",
80: "LetfArrow"
}

keys = [] # list to store the decoded keystrokes

# open the generated csv
with open("leftover.csv",'r') as f:
    lines = f.readlines() # read all lines

    # for each line in leftover.csv
    for line in lines:
        # split on each comma, and grab the leftover data column
        leftover = line.split(',')[6]
        try:
            # slice the leftover data column, grabbing only the 3rd byte
            # convert that value from hex to decimal, and grab the table_map
            # value that matches, and then append to the keys list
            keys.append(table_map[int(leftover[5:7],16)])
        except:
            continue

# join and print the data
print("".join(keys))
Running the above script we get this output:
nnottepaadexeEnterohspacehhispaceyoouuspacefiigurredspaceitspaceooutspacegoodspacejjobspaceimmspacegonnaspacegoospaceaheeaadspaceandspacetyypespaceaaspaceffeewspacetthiinngsspacettoospacemakespacetthhisspacepprrettyyspaceannooyiingspacessospaceyoouuspacecantspacejusstspaceitspacedeldeldeldoospaceitspacemanuallyspaceookspacetthhaatsspaceenooughspaceflaag{usb_pcaps_arre_fun}cq
Nice, we figured out what the cat was doing!
Flag: flag{usb_pcaps_are_fun}

Challenge: A3S Turtles
Category: Stego
Description:
[250 pts]: Turtles all the way down. (File: turtles128.zip)
Walkthrough:
This was an interesting steganography challenge that required a little bit of everything: Password cracking, scripting, and even some Encryption
Upon trying to open the given ZIP file, I realized that it was actually protected by a password:
I tried some easy passwords like Password, Tenable, A3S, Turtles, etc. None of these worked so I assumed that I would need to crack the ZIP password. I switched over to my laptop running ParrotOS and ran zip2john on the zip file like so:
zip2john turtles128.zip > turtles128.hash
This generated a hash which I then fed to John the Ripper:
john --wordlist=/usr/share/wordlists/rockyou.txt turtles128.hash
john --show turtles128.hash
This revealed the password to be 0 for turtles128.zip. Cool, let’s extract the contents of the zip file. Doing so, we get another ZIP file named turtles127.zip which is also password protected. Running the same commands on turtles127.zip, reveals the password to also be 0 for this ZIP file. Extracting it we get turtles126.zip.
Oh boy, nested ZIP files! This presumably goes all the way down to 0 or 1 which is a lot of passwords to crack by hand so there has to be some trick, right? If we try to extract turtles126.zip with a password of 0, we get an incorrect password error. Cracking turtles126.zip reveals the password to be 1 this time. Hm.. interesting..
I cracked the first 4 or 5 files by hand during the competition and each time the password seemed to be either 0 or 1 which screams binary data. But this is obviously a lot of work to do by hand, so I crafted a Python script to do it for me:
from zipfile import ZipFile

# base file name
file = "turtles"

# file number
num = 128

# list to store the binary values
binary = []

# while there are still zip files to extract
while True:

    # open the current zip file
    with ZipFile(file+str(num)+".zip") as zf:
        try:
            # try to extract with a password of 1
            # and append "1" to the binary list
            zf.extractall(pwd=b'1')
            binary.append("1")
        except:
            # if 1 doesn't work, extract with a password
            # of 0, and append "0" to the binary list
            zf.extractall(pwd=b'0')
            binary.append("0")

    # decrement num by 1 for the next zip file name
    num -= 1

    # if num == 0, we've extracted all of our zip files
    if num == 0:
        break

# write all of the binary data to a file named data
with open("data","w") as f:
    f.write(" ".join(binary)
This generated a file that I named data which contained the password for each file (binary data):

As well as revealed a file named key.png, which was extracted from the last zip file, which looked like this:

Hm.. so we have some binary data and a key which most likely means that this data is encrypted somehow. I had recently solved a challenge that involved a Multibyte XOR cipher so, out of instinct from seeing the key, that was the first thing I tried. This did not lead me anywhere and I was confused for a little bit.
Taking a step back from everything, I realized what the challenge name was hinting at: A3S = AES!
Let’s use CyberChef to AES decrypt the data with the following settings:
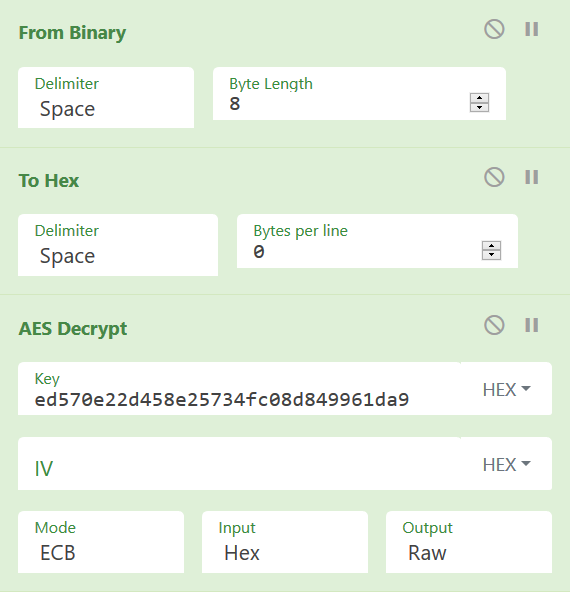
Doing so reveals the flag:
Nice! Very cool challenge.
Flag: flag{steg0_a3s}
Challenge: Look at all the pixels, where do they all come from?
Category: Stego
Description:
[125 pts]: Maybe there is something hidden in this picture? (File: pip.png)
Walkthrough:
This was a pretty cool steganography challenge that actually had a lot fewer solves during the competition than I expected. Opening up the provided PNG file we’re presented with the following:
![]()
Interesting.. just looks like a bunch of noise. Since the challenge title tells us to look at the pixels, let’s do that!
Opening up the PNG file in GIMP (or any other image manipulation program, e.g., Photoshop), we can zoom in to look at each individual pixel:
![]()
Interesting, it does seem that each pixel is a distinct color with no real relation to the pixels around them. Perhaps the hex values for each color represent something? Let’s grab the hex values of the first few couple pixels using the color picker tool:
![]()
Alright, so we have the hex values 89504e and 470d0a, let’s throw those into CyberChef to decode them real quick:
![]()
Oh nice, that looks like the header for another PNG file!
So it seems that each pixel’s hex value represents 3 bytes of another PNG file. So we need some automated way to extract the hex value of each pixel and then write the bytes to a file. We can use the Python Imaging Library (PIL) to help us with that, and craft something like this:
from PIL import Image

# convert RGB values (tuple) to hex
def rgb2hex(val):
    r = hex(val[0])[2:].zfill(2)
    g = hex(val[1])[2:].zfill(2)
    b = hex(val[2])[2:].zfill(2)
    hexd = bytes.fromhex((r + g + b))

    return hexd

# open pip.png (given)
img = Image.open("pip.png",'r')

# get the RGB values for each pixel
vals = list(img.getdata())

# convert each pixels RGB values to hex
data = [rgb2hex(x) for x in vals]

# write each byte of hex data into a file called decoded.png
with open('decoded.png','wb') as f:
    f.write(b''.join(data))
Running the script we get the following image as output:
![]()
Very cool!
Flag: flag{p1ctur3_in_picture}
Challenge: Follow The Rabbit Hole
Category: Web
Description:
[100 pts]: Follow the rabbit hole and get the flag.
http://167.71.246.232:8080/rabbit_hole.php
Walkthrough:
This was a nice challenge that highlighted the importance of knowing how to automate tasks using a scripting language like python or bash.
Navigating to the provided URL, we’re presented with the following:

That is the only text on the page. Admittedly this had be confused for a little bit until I noticed the URL had changed from when we initially navigated to the page:
http://167.71.246.232:8080/rabbit_hole.php?page=cE4g5bWZtYCuovEgYSO1
Interesting, that page parameter looks to be about the same length as the random string of characters that we see on the page. So what happens if we take that data and supply it to the page parameter?
http://167.71.246.232:8080/rabbit_hole.php?page=4O48APmBiNJhZBfTWMzD

Ah, we’re presented with similar but different information. You could continue doing this, but as you will soon see this would be quite the task to do by hand.
So it seems that each page contains
- Some number, possibly the order of each page
- Some hex data and
- The url for the next page
I am most comfortable in Python, so I decided to solve this challenge using it but this challenge could also be solved with Bash or really any other language.
I first started with crafting the following script:
import requests

# base url
url = "http://167.71.246.232:8080/rabbit_hole.php?page="

# value of the page parameter
page = "cE4g5bWZtYCuovEgYSO1"

# Until we're out of pages
while True:
    # Navigate to the page
    r = requests.get(url+page)

    # Get the content of the page
    data = r.content

    # Decode so that we're dealing with UTF-8
    # and replace the newline characters so that it's all on one line
    data = data.decode().replace('\n',' ')

    # update the page variable with the next page
    page = data.split()[2]

    # Write all of the data to a file named data
    with open("data",'a') as f:
        f.write(str(data) + '\n')
This generates a file that I named data with all of the data from each page, which looks like this:
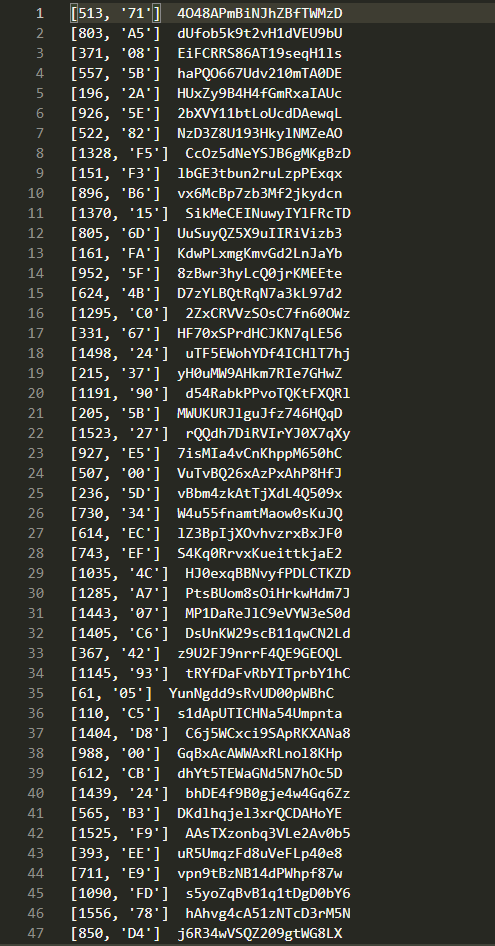
And as I said before, doing this by hand would be quite the task because this file is a whopping 1,582 lines long.
Ok, so we have the data from each page, let’s see if we can figure out what this hex data is supposed to be. Using ctrl + f and using this Regex: ^\[0,
Brief Regex explanation:
- ^ = “Starts with”
- \[ = escape the bracket to include it in our search,
- 0, = number followed by comma so we don’t get other numbers
we can extract the hex data for the actual first few pages just by updating 0 to 1, to 2, etc. Doing this for the first 4 pages we get: 89 50 4E 47 Let’s decode that using CyberChef:
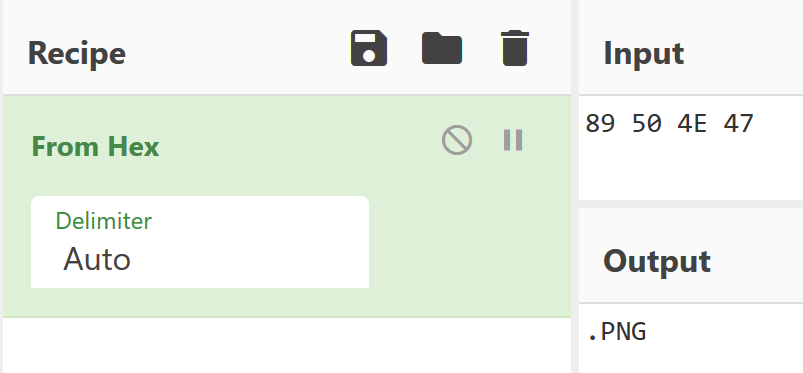
Cool, the hex data seems to make up a PNG file! Now all we have to do is write each byte of hex to a file, so I crafted a script to do that:
# function to sort the data
def my_sort(line):
    # split the line and grab the first number (page number)
    val = int(line.split()[0][1:-1])
    return val

# list to store the bytes
img_bytes = []

with open("data",'r') as f:
    # read all of the lines in data
    lines = f.readlines()

    # sort the lines using my_sort function
    lines.sort(key=my_sort)

    # for each line
    for line in lines:
        # split the line and grab the hex value
        hex_val = line.split()[1][1:-2]
        # convert the hex value to a bytes object and append to img_bytes list
        img_bytes.append(bytes.fromhex(hex_val))

# create a file named rabbit_hole.png in a: append mode and b: binary mode
with open("rabbit_hole.png",'ab') as f1:
    # join all of the bytes in img_bytes together and write to the file
    f1.write(b''.join(img_bytes))
Running the script we get this image:

Indeed, it is!